Sometimes, you just need to do something creative—and why not share that with a group of friends, neighbors or colleagues? Make a day of it with this Shibori party tea towel workshop. Luckily for me, my day-to-day is working in the Art Materials Industry. I have taught courses and led demos on a huge range of products, including knitting, watercolor, rock painting, jewelry making, furniture restoration, paper crafting, acrylic painting techniques, and a wide variety of children’s classes. It’s been a fantastic 8 years.
Shibori tea towels with Jacquard Indigo Dye
As a person who is curious and creative by nature, I crave the ability to jump out of my daily grind and do something new. I decided to try out making Shibori Tea Towels on a rare free Sunday. I documented the process so that art educators, facilitators, and fellow art nerds can host their own Shibori workshop. Read on for detailed instructions and lessons learned after I hosted a Shibori party at my house!
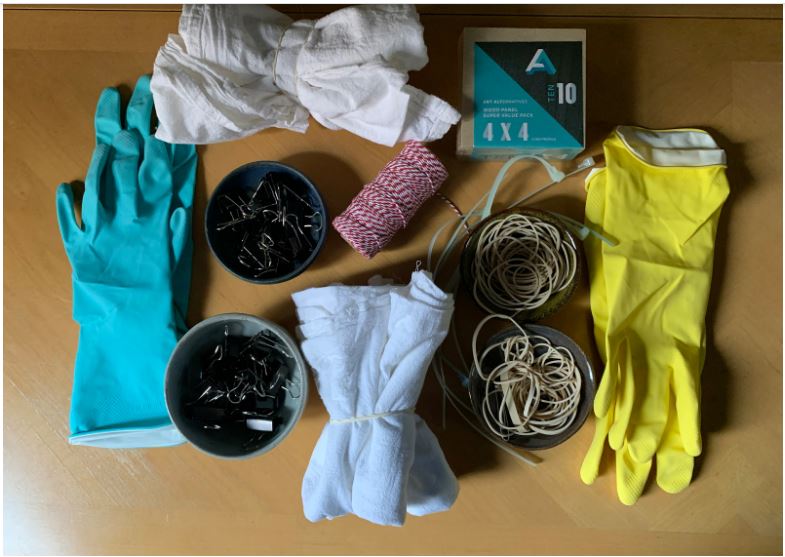
What you’ll need:
- Flour Sack Towels (2-4 per person)
- Plenty of rubber bands
- Binder Clips
- Zip Ties (reusable zip ties are the way to go, they are easy to release from the fabric)
- String
- Gloves
- Jacquard Indigo Dye Kit
- or (for larger groups) Jacquard Pre-Reduced Indigo and Sodium Hydrosulfite Set
- Two 1-gallon (size can be flexible) buckets per every 4 friends
- One 5-gallon bucket to mix and store dye
- Plastic grocery bags to transport wet fabric home
The week beforehand
- Spend some time watching YouTube videos on the history of Shibori, different folding and fastening patterns and techniques, and the history of indigo dye. Not only will this give you the opportunity to practice folding, but it will also give you a knowledge base on the product to educate your friends while they fold.
- VIDEO: Indigo Shibori Patterning Techniques
- VIDEO: Indigo Dyeing with the Jacquard Indigo Kit
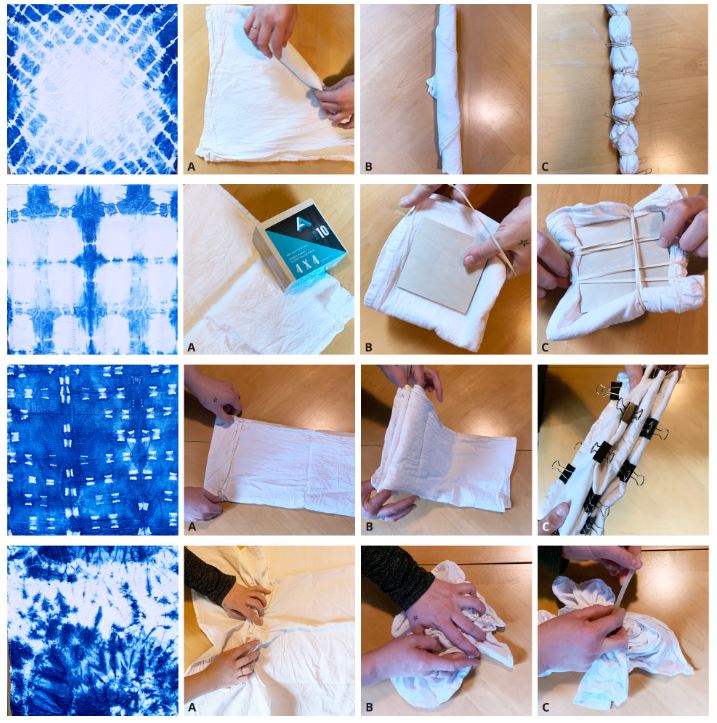
- It goes without saying, but just in case: practice! Use a piece of paper to practice the folding techniques, and to use while demonstrating for your group. Above: four folding techniques (see below for detailed steps).
- Teach a fold or history lesson to a friend or co-worker prior to the event and get their feedback on what they don’t understand.
- Pre-wash your towels using free and clear detergent; do not use fabric softener or dryer sheets.

Four folding techniques I practiced in preparation for teaching my friends.
An Hour Before your Shibori party
- Mix the dye bath with HOT water (you can get a deeper color and the bath is ready a little faster if you use hot water to dissolve the dye). Get up one bucket of clear water and one bucket of water with a laundry detergent for every 4 people. Anything with dyes or scents is no good. It will attach to the fabric and coat the fibers so the dye won’t penetrate.
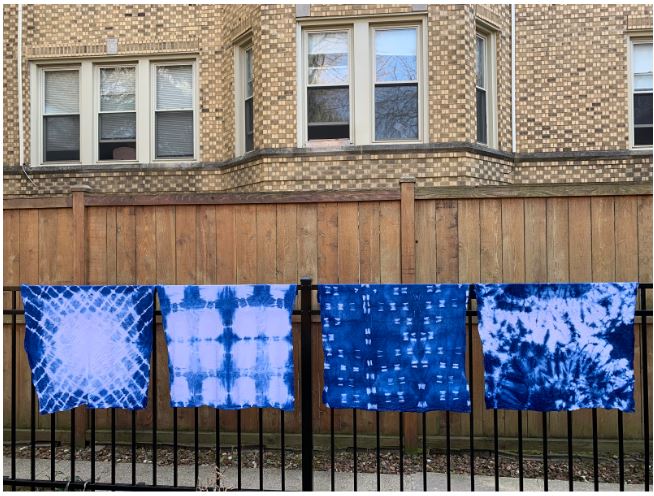
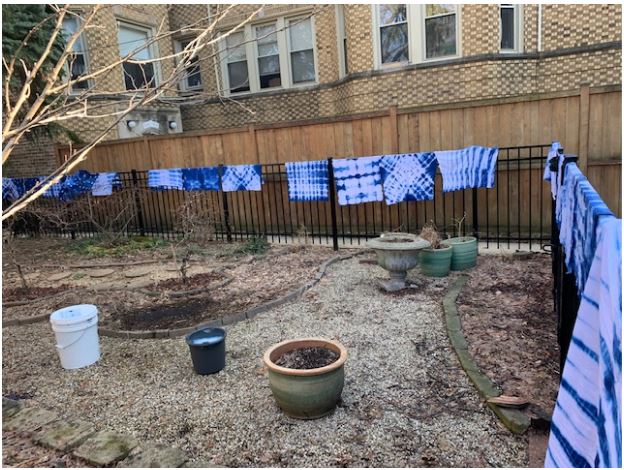
- Ensure you have a place for the finished towels to dry. I used my fence, but you could easily hang up a clothesline using some twine and strong Command Hooks.
- Set up containers with binder clips, rubber bands, wood pieces, zip ties, and string on your folding table.
- Set each seat with a pair of gloves (have a latex-free option available) and 2-4 pre-washed and folded tea towels.
Friends Arrive at your Shibori party
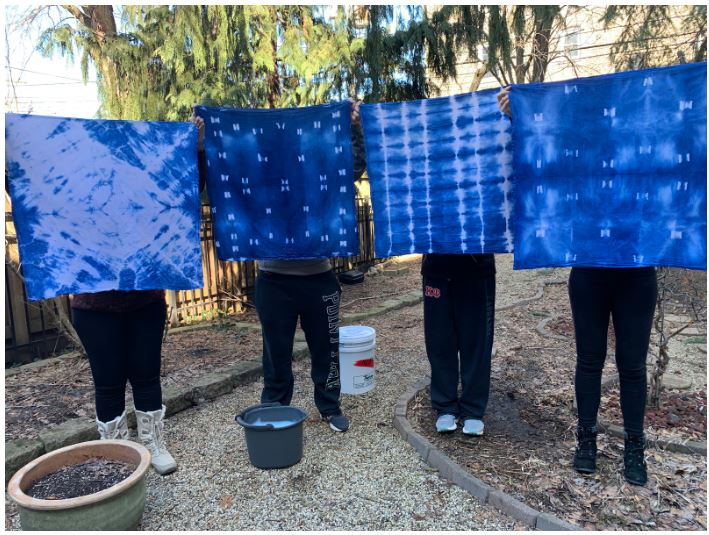
Have information about the history of Shibori on the table. If possible, have examples of dyed (and washed) fabric available for everyone to feel and see while they get settled. Have examples of once-dipped, twice-dipped, and thrice-dipped fabric to demonstrate how deep the color can get.
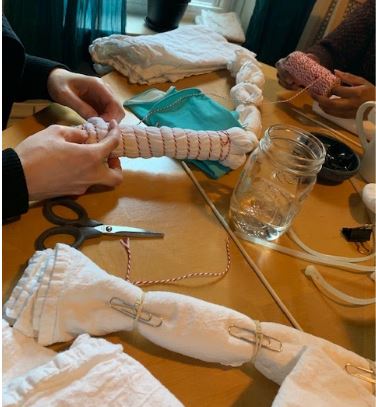
Stef and Sheridan used string to create a different style of binding.
Teaching The Workshop (1 – 1.5 hours)
- Shibori party Ice-Breaker (10 – 15 minutes): Go around the room and ask everyone to introduce themselves (Name, occupation, and something fun like a favorite book…this is a social activity after all).
- Background Info (3-5 minutes): Give a brief history of Shibori, its cultural significance, and how it differs from modern dying techniques.
- Folding (30 minutes): Dive in! Start with a simple folding pattern and fold it step-by-step along with the class participants. Graduate to the more difficult patterns as you progress. On the final technique, allow your friends to make their own design if they wish (by now, some will be comfortable enough experimenting on their own, but you will very likely have someone that wants direction every step of the way.) Remember that perfection isn’t the goal. The goal is to teach a skill that they can perfect at home.
- Time to dye! (20 – 30 minutes) Follow the manufacturer’s instructions and demonstrate the entire process for your group before having them try. Don’t forget your gloves!
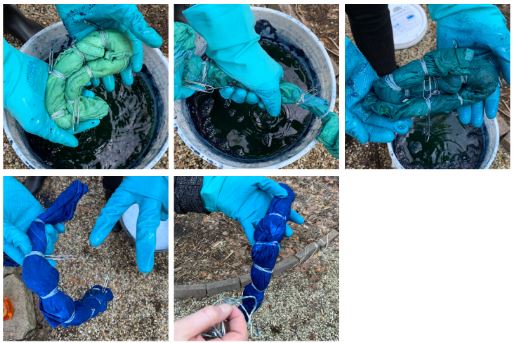
The Fabric appears green when removed from the dye bath; squeeze out excess dye.
After the second dye bath, once the dye oxidizes, it will be a dark blue color.
- Step One: Submerge your tied fabric in water.
- Step Two: Squeeze out excess water, and continue to squeeze fabric as you submerge it into the dye. This part is to continue pushing moisture out so when the fabric “breathes in” again, it’s sucking in the dye for deeper, richer color.
- Step Three: Hold fabric under the surface (but don’t let it drop to the bottom!) for 10-20 seconds, squeezing and working the fabric.
- Step Four: When the fabric emerges, it will be bright green. Talk about the oxidation process of Indigo and remind your students that the final blue color appears darker while the fabric is wet.
- Step Four and a half: Once the colour deepens, re-dip your fabric in dye if you want a darker color. You can dip your fabric as many times as you wish until the desired depth of color is achieved.

Three phases of Oxidation. At left is most recently dyed.
Right have been out of the vat longer and the colour shows darker.
- Step Five: Submerge dyed fabric in the clear water bucket and remove any excess dye (ensure everyone has completed the first step of wetting their fabric before you add dye to this water).
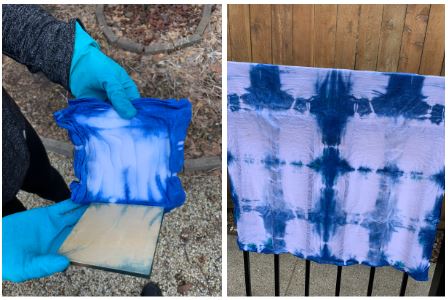
<Wood Resist method, dipped twice>
<Binder clips, dipped twice>
<Scrunch technique, dipped three times.>
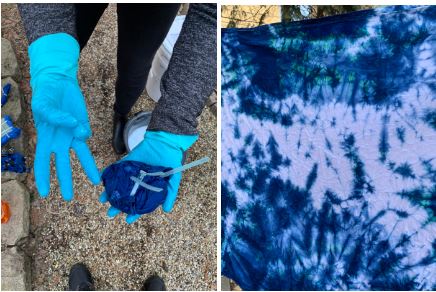
- Step Six: Once all pieces are dyed and rinsed, take off the binding to reveal the pattern.
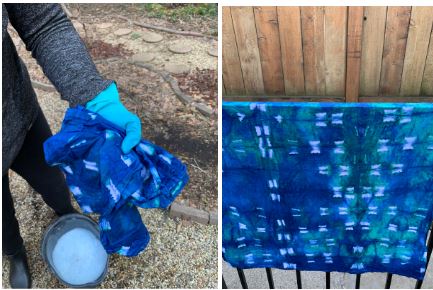
- Step Seven: Submerge finished pieces in the detergent water, rinse again, then hang to dry (this will allow your friends to throw their finished project in the wash when they get home. Be sure to encourage them to wash in COLD water with dark colored fabrics or jeans the first time.) If you don’t have space or time for the towels to dry, offer plastic grocery bags to transport the wet towels home to be rinsed and laundered.
Lessons Learned – Shibori party feedback from guests
After my Shibori party, I asked the group to give me some feedback on what they found most exciting or could have used more instruction on.
- Don’t skip the welcome warm-up. My friends didn’t all know one another, and though we found places in the workshop to learn about one another, folding in silence is kind of awkward. Having that introduction time would have given a more natural flow to conversations around the table.
- Practice your folds! When rolling fabric, the innermost part of the roll will receive very little dye: this is great for an Ombre effect. Be sure to give pressure to the creases in your fabric for crisper lines.
- Remind everyone about the importance of gloves. I invited my group to bring any jeans they wanted to re-dye to class. After the instructional part, poor Caitlin dipped her jeans with bare hands and went home with blue fingers.
- The reveal is the most fun! Having everyone untie their fabric all at the same time allows for lots of “oooh and aaaah” moments at the end of the workshop, leaving everyone with a warm fuzzy to end the afternoon.
- Colors appear darker when wet. Unless you want a light blue, I encourage dipping multiple times.
- Allow your friends to bring jeans, t-shirts, or anything to dip. You will have extra dye if you have fewer than 15 people attending.
Thank you to our friends at Art Supply Enterprise for this illustrative and helpful post.

Art Supply Enterprises licenses the above content, “Shibori Tea Towels With Jacquard Indigo Dye”, to its partners & affiliates under the Creative Commons Attribution-NoDerivatives 4.0 International License. All uses of this content should include the following attribution: “Shibori Tea Towels With Jacquard Indigo Dye” by Art Supply Enterprises is licensed under CC BY-ND 4.0